Step-by-Step: How to Do a Can Seam Teardown
1. Gather your gear.
You’ll need:
- A can opener designed for seam teardown (like the CMC or Zahn units—not Grandma’s kitchen one).
- Seam micrometer (measures thickness and height).
- Seam saw or nippers (if you don’t have a dedicated teardown tool).
- Magnifier or seam scope (for those inner profiles).
- Calipers and a notepad or template sheet to record readings.
- Safety gear (gloves, goggles, and ideally, something to keep beer off your pants).
2. Pick a few cans to test.
Pull at least:
- One from the start of the run (after first 10–15 cans).
- One from the middle of the run.
- One from the end (after a lid change or cleaning cycle).
More if you adjusted seamer settings mid-run — because “we just tweaked it once” is famous last words.
3. Measure the external seam before cutting.
Use your seam micrometer to measure:
- Seam height (vertical dimension).
-
Seam thickness (horizontal width).
Take three readings around the can and average them.
→ If you’re not within spec, stop and adjust before slicing anything open.
4. Cut the can lid about ¼” below the double seam.
Use your seam saw, Dremel, or nippers.
You’re not trying to decapitate it—just remove the lid cleanly enough to expose the seam cross-section.
Pro tip: Cut slowly so the seam doesn’t warp. Bent seams lie worse than sales reps on quota day.
5. Inspect the cross-section.
Under magnification, check for:
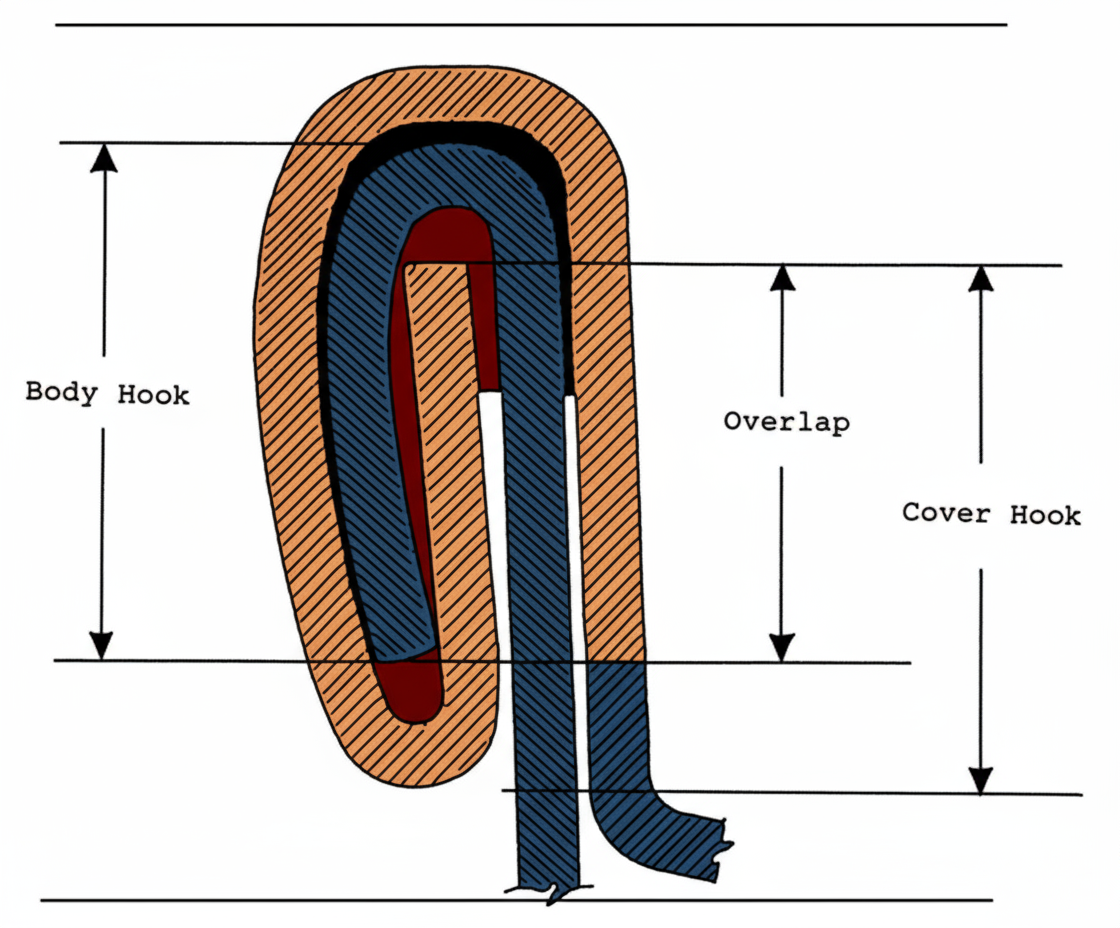
- Cover hook length (how much lid metal is folded in).
- Body hook length (how much can wall is folded).
- Overlap (the amount the two hooks interlock—should be ≥45–50%).
- Tightness (no visible voids or daylight).
- Wrinkles or false seams (bad juju = oxygen ingress).
If it looks like a lasagna cross-section—layered and tight—you’re good. If it looks like a croissant—airy and uneven—you’ve got problems.
6. Take measurements under magnification.
Use a calibrated reticle or digital scope to measure:
- Cover hook
- Body hook
- Overlap
- Tightness (gap)
Compare to your can manufacturer’s seam spec sheet (Ball, Ardagh, etc.).
7. Record, record, record.
Write down readings, can date code, operator, seamer head #, and run conditions.
If something’s off, you’ll know exactly when it went sideways (and who to buy lunch for).
8. Adjust and recheck.
If overlap or tightness is out of spec:
- Adjust the 1st operation first — it does most of the folding.
- Then tweak 2nd operation for final compression.
Never fix a bad 1st op with a “harder” 2nd op—like trying to fix burnt toast by buttering it more.
9. Bonus move: flatten and peel.
If you lack a saw, you can cut the lid edge off, flatten it, and peel back the cover hook with pliers.
Not as clean, but shows you the basic hook shape and whether it’s tucked properly.
10. Rinse, repeat, and celebrate.
Do another teardown after adjustments to confirm you’re back in spec.
If your numbers look good, raise a can to the seamer gods—you’ve earned it.

